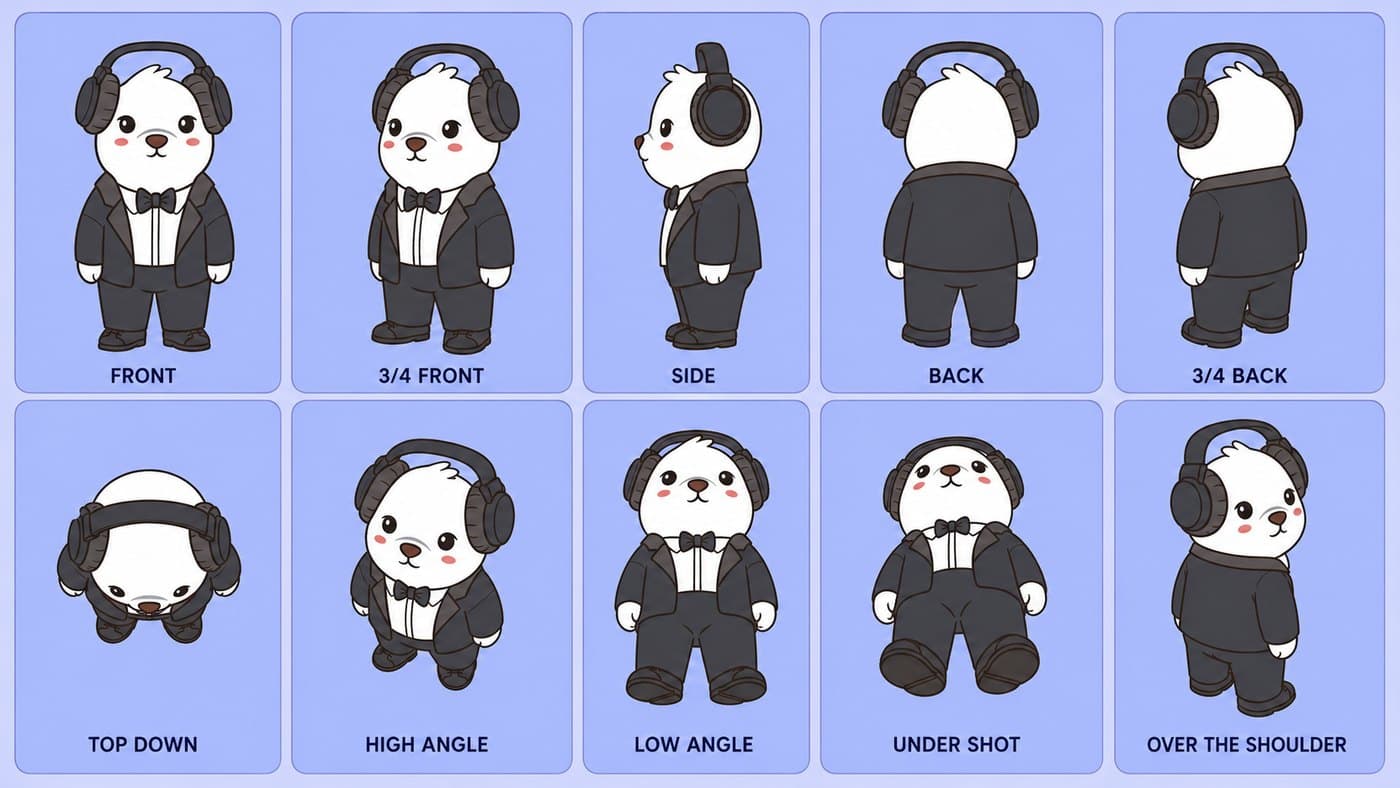
turnaround sheets
ai creative studioCreate the camera-angle reference only after your front-facing full-body bear is approved. This page helps you turn one good character image into a reusable 10-panel sheet.
inputs
- 1
image 1: approved bear
Use the full-body front-facing character from the conversion step. This is the only source of truth for identity, style, colors, outfit, and proportions.
- 2
image 2: optional layout reference
Use a sample angle sheet only to show panel layout and camera framing. It should not contribute character design.
- 3
prompt: separate identity from layout
Tell the model exactly which image controls the bear and which image only controls the sheet structure.
do not let the layout image redesign the bear
If you provide a sample angle sheet, tell the model to borrow only the layout and camera framing. The Bearish character must come only from your full-body reference image.
10-panel turnaround sheet prompt
TASK:
Create a single 16:9 landscape character turnaround and camera-angle reference sheet using the provided character image.

PRIMARY GOAL:
Generate the SAME character in 10 clean reference panels.
This is a CAMERA / VIEW ANGLE SHEET, not an action pose sheet.

INPUT IMAGE USAGE:
- Image 1 is the only source of character identity, outfit, colors, proportions, accessories, and art style.
- If Image 2 is provided, use it ONLY as a loose 2 row x 5 column layout reference.
- Do NOT copy Image 2's character, clothing, colors, art style, body posture, pose, facial design, or bottom-row pose behavior.
- The written panel instructions below override Image 2 completely.

CORE IDENTITY LOCK:
The character must remain 100% identical to Image 1 in every panel.

Preserve exactly:
- Face shape and structure
- Facial expression
- Eye shape, size, placement, and color
- Nose and mouth design
- Ears, head shape, hair/fur features, and asymmetry
- Hat, headphones, clothing, accessories, colors, patterns, and fit
- Body proportions and silhouette
- Line thickness, outline style, color behavior, shading style, and visual weight

Do not:
- Redesign the character
- Simplify the character
- Change proportions
- Change the outfit
- Change accessories
- Fix asymmetry
- Add new clothing, props, logos, watermarks, or decorative elements
- Borrow any design detail from Image 2

ART STYLE LOCK:
- Match Image 1 exactly.
- Same rendering style as Image 1.
- Same outline thickness.
- Same shading approach.
- Same color palette.
- Same level of detail.
- Do not make it realistic, 3D, painterly, glossy, furry-realistic, anime-different, or semi-realistic unless Image 1 already has that style.

SHEET LAYOUT:
- One unified 16:9 landscape image.
- Exactly 10 panels.
- 2 rows x 5 columns.
- Equal panel sizes.
- Clean margins.
- Simple plain background inside each panel.
- Character centered in each panel.
- Full body visible in every panel unless the camera angle naturally foreshortens the body.
- Same character scale across the sheet.
- No extra panels.
- No missing panels.

TEXT / LABEL RULE:
Render ONLY these exact labels under the panels.
Do not render yaw numbers, pitch numbers, degrees, camera notes, explanations, or small subtitle text.

Top row labels, left to right:
FRONT
3/4 FRONT
SIDE
3/4 BACK
BACK

Bottom row labels, left to right:
TOP DOWN
HIGH ANGLE
LOW ANGLE
UNDER SHOT
OVER THE SHOULDER

IMPORTANT:
The labels are display text only.
The angle instructions below are for rendering the image and must NOT appear as text in the image.

GLOBAL POSE LOCK:
The character stands upright in the same neutral full-body stance in every panel.
Arms stay relaxed.
Legs stay evenly spaced.
The body does not sit, lie down, crouch, bow, lean, recline, jump, float, walk, run, gesture, or perform an action.
Only the camera view and the character's rotation change.

ONLY EXCEPTION:
For the OVER THE SHOULDER panel, the body remains in the same standing pose, but the head may turn slightly back toward the camera so a small part of the face/profile is visible.

CAMERA SYSTEM:
- Yaw means horizontal rotation of the character.
- Pitch means vertical camera height.
- Roll is always 0 degrees.
- Eye-level views use pitch 0.
- High views look down from above.
- Low views look up from below.

TOP ROW — PURE TURNAROUND, EYE-LEVEL CAMERA:

1. FRONT
Eye-level camera.
Character yaw 0 degrees.
Direct front view.
Both eyes visible.
Full face and front of outfit visible.
Nose/mouth centered.
Both arms visible.
Symmetrical neutral standing pose.

2. 3/4 FRONT
Eye-level camera.
Character yaw about 45 degrees.
Front and one side visible.
Both eyes still visible, but one side is more dominant.
Nose/mouth shifts slightly toward the turned side.
One side contour of the body is visible.
Neutral standing pose.

3. SIDE
Eye-level camera.
Character yaw 90 degrees.
Pure side profile.
Only one eye visible.
Nose/mouth projects sideways.
Only one side of the body is visible.
No front-facing chest.
No back-facing tail-centered view.
Neutral standing pose.

4. 3/4 BACK
Eye-level camera.
Character yaw about 135 degrees.
Rear three-quarter view.
Mostly the back is visible, plus one side of the head and body.
Back of outfit, hood, hat, headphones, and tail are visible if present.
Only a tiny side edge of the nose/mouth or cheek may be visible.
Do not show a full face.
Do not make this a direct back view.

5. BACK
Eye-level camera.
Character yaw 180 degrees.
Direct rear view.
Back of head, hat, headphones, hood/outfit, legs, and tail are centered.
No eyes visible.
No nose visible.
No mouth visible.
No nose/mouth visible.
This is a flat rear silhouette.

BOTTOM ROW — CAMERA ANGLE STUDIES, CHARACTER STILL STANDING UPRIGHT:

6. TOP DOWN
Camera directly above the standing character, looking straight downward.
Overhead view, about 80 to 90 degrees above the character.
The character is standing like a vertical column seen from above.
The top of the hat/head is the dominant shape.
Shoulders, arms, body, and feet appear as smaller shapes below or around the head.
Face is mostly hidden or barely visible.
Do NOT show the character lying on its back.
Do NOT show belly facing the camera.
Do NOT show foot soles facing the camera.
Do NOT make this look like a reclining pose.
Do NOT use an under-shot view.
The viewer should feel they are looking down at the top of the standing character.

7. HIGH ANGLE
Camera above and slightly in front of the standing character, looking downward.
About 40 to 50 degrees above eye level.
Front of face still visible.
Top of hat/head and shoulders clearly visible.
Head appears slightly larger than the feet due to perspective.
Feet appear smaller and farther away.
The character remains upright.
Do NOT make the character bow.
Do NOT make the character look down.
Do NOT make this a flat eye-level front view.

8. LOW ANGLE
Camera below the character's eye level, looking upward from the front.
About 25 to 35 degrees below eye level.
Front of face, chest, and outfit are visible.
Feet and lower body appear slightly larger and closer.
Head appears slightly higher and farther away.
Underside of chin/nose/mouth or hat brim may be slightly visible.
Both eyes should still be visible.
Do NOT turn the character sideways.
Do NOT show the back.
Do NOT make this an eye-level front view.

9. UNDER SHOT
Extreme low-angle front view.
Camera near the ground in front of the standing character, looking sharply upward.
About 60 to 75 degrees below eye level.
This is a dramatic worm's-eye view from the FRONT.
The front of the outfit is visible.
Underside of chin/nose/mouth is visible.
Bottoms/fronts of feet or shoes may be visible in the foreground.
Feet are closest to the viewer.
Head is higher and farther away.
Do NOT show the back of the character.
Do NOT show the tail.
Do NOT make this a rear view.
Do NOT make this a simple back panel.
Do NOT make the character lie down.

10. OVER THE SHOULDER
Rear three-quarter over-the-shoulder view.
Camera is behind the character and slightly to one side, near shoulder height or slightly above.
Body yaw about 135 degrees, mostly facing away.
Back of outfit, hood, hat, headphones, and one shoulder dominate the view.
The body remains standing in the same neutral pose.
Only the head turns slightly back toward the camera.
Show a small partial profile: one eye, side of nose/mouth, or cheek edge may be visible.
Do NOT show a full front face.
Do NOT make this a plain direct back view.
Do NOT make it identical to the BACK panel.

VIEW-SPECIFIC ERROR PREVENTION:
- TOP DOWN must look like looking at the top of a standing character, not a character lying on its back.
- HIGH ANGLE must show the top planes of the head/hat/shoulders.
- LOW ANGLE must be a front upward view, not a side view.
- UNDER SHOT must be a front worm's-eye view, not a rear view.
- OVER THE SHOULDER must show a partial face/profile from behind one shoulder, not a flat back view.
- BACK and 3/4 BACK must be different from each other.

NEGATIVE RULES:
No lying down.
No sitting.
No crouching.
No bending forward.
No bowing.
No reclining.
No action poses.
No walking poses.
No side view for LOW ANGLE.
No back view for UNDER SHOT.
No foot soles in TOP DOWN.
No belly-up pose in TOP DOWN.
No direct back view for OVER THE SHOULDER.
No yaw/pitch text in the image.
No degree numbers in the image.
No explanatory subtitles.
No swapped labels.
No duplicated panels.
No inconsistent outfit.
No inconsistent accessories.
No inconsistent face.
No inconsistent proportions.
No character redesign.
No style drift.

FINAL QUALITY CHECK:
Before finishing, verify:
- Exactly 10 panels.
- Correct 2 x 5 layout.
- Only the requested labels are printed.
- Top row reads: FRONT, 3/4 FRONT, SIDE, 3/4 BACK, BACK.
- Bottom row reads: TOP DOWN, HIGH ANGLE, LOW ANGLE, UNDER SHOT, OVER THE SHOULDER.
- Same character identity in every panel.
- Same outfit and accessories in every panel.
- Same art style in every panel.
- The character remains upright in every panel.
- Each camera angle is visually distinct.
- No label contains yaw, pitch, camera notes, or extra text.
what each panel means
Use these definitions when checking the sheet. The model should change camera angle, not pose, identity, clothing, or art style.
Front: straight-on, full face visible.
3/4 front: about 45 degrees, with some depth visible.
Side: clean profile view.
Back: rear view with no face visible.
3/4 back: rear 45-degree view.
Top down: directly above, showing top surfaces.
High angle: above and tilted down, with partial face visibility.
Low angle: below and tilted up.
Under shot: extreme low angle, underside emphasized.
Over the shoulder: rear 3/4 view with slight face visibility if natural.
quality check
The same pose should appear in every panel. Only the camera angle changes. If the sheet duplicates angles, misses panels, changes clothing, or redraws the head, regenerate or repair the failed panels before using it as a reference.